Why Add Google Analytics To Your Site?
Google Analytics, designed by Google, tracks the amount of visitors to your website, where they came from and how long they stayed. It will also show you the keywords they used to find your site, the names of search engines or other websites that referred visitors to your site and more. Adding Analytics to your website is crucial if you want to increase traffic and improve conversion rates, among other things.
Read on to find out how easy it is to add Google Analytics to your website, step by step.
How To Add Google Analytics To Your Site
First you will need to create a Google Analytics account….
To do this, you’ll first need a google account if you don’t already have one. Most people will already have one, like if you have Gmail, or a Youtube account etc, that will be your google account name.
Get a Google Account here – https://accounts.google.com/signup
Or sign up for Google Analytics here – https://www.google.com.au/analytics
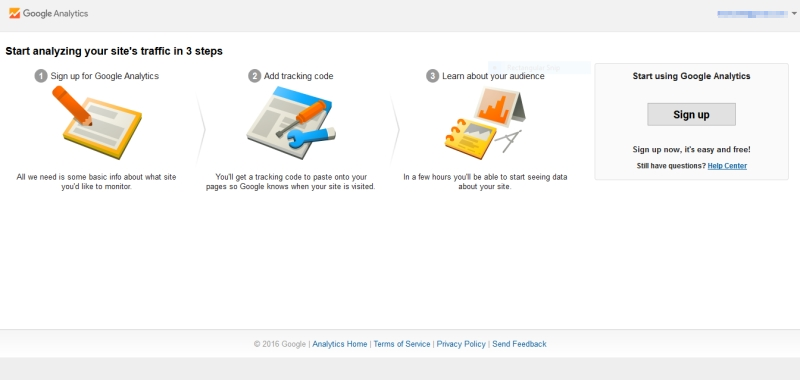
When you go to sign up for Google Analytics you will see this page…
Just hit sign in.. then sign up on this next page..
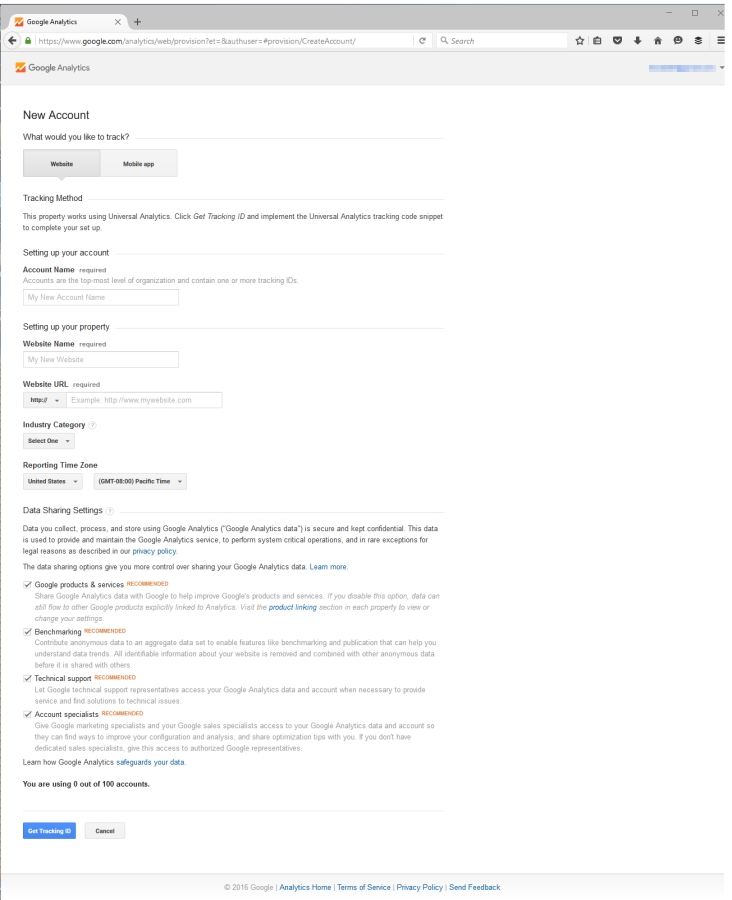
After you click the Sign Up button, you will fill out information for your website…
All simple stuff really…
At the top make sure “website” is selected.
Account name – This is just for your own reference, and is the name that will appear in your Google Analytics reports.
Website Name – Simply put the name of your website or URL
Website URL – Enter your primary domain…just the ‘www.yoursite.com’ part (note the ‘http://’ part is already inserted)
Industry Category – Completely optional, choose the one that you think fits best.
Reporting Time Zone – Simply the time zone you would like to get reports for.
Data Sharing Settings – This is your own preference and I wouldn’t worry too much about it… I leave them all ticked
Click on blue button Get Tracking ID and agree to the Terms of Service.
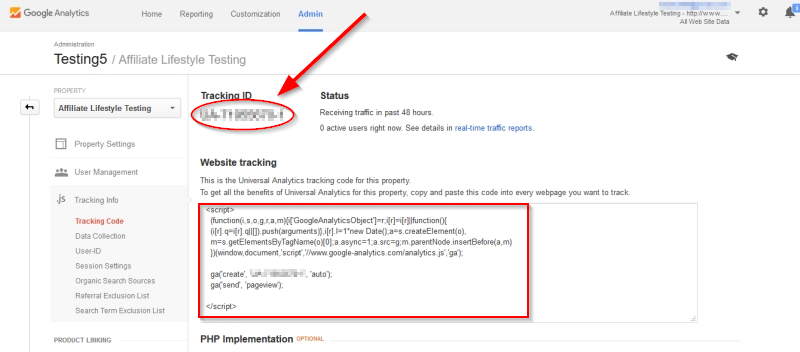
After you complete the signup information, you’ll receive the tracking code from Google that monitors visits to your site. like this
If you’re using a WordPress plugin to add Google Analytics, see the red arrow, the code will look something like this: UA-31489828-1. See below for plugin options…
If you’re not using a plugin (or WordPress) and want to insert it manually…
(You should be comfortable editing HTML to do this) you’ll need to copy the piece of code Google displays next (within the red box) starting with <script> and ending with </script>, and paste it into all pages you want to track. You should paste it immediately before the closing </head> tag of any page.
Installing using a plugin…
To install any wordpress plugins… go to your wordpress dashboard and click on Plugins >> Add New.
Type the plugin name in the search bar, (or the type of plugin, if you want to browse whats available, eg in this case ‘analytics’.
When you found what you need, click the install button. You will then see WordPress installing the plugin. Make sure you activate the plugin when its done.
In your settings menu, in your WordPress dashboard, you will find your chosen analytics plugin. This is where you will add your Tracking ID you got from Google Analytics (UA-0000000-0) or connect to your Google Analytics account, depending upon which plugin you are using.
Here are just a few recommendations of plugins you can install to add Google Analytics simply, and that are free and quite simple to use. Some come with premium versions but that is completely optional, and up to yourself… the free versions work fine.
Google Analytics by MonsterInsights
Google Analyticator
Google Analytics Dashboard for WordPress
NK Google Analytics
If you want to know more about each plugin, just click on ‘More Details’ on each plugin to read up on what may suit you best.
Any questions, feel free to contact me via my contact page, or suggest some more good ones below if you know any.


Leave a Reply